
Disable Chrome and Edge enhanced spell check to prevent data leak
Microsoft Edge and Google Chrome’s enhanced spell checking and the Microsoft Editor browser extension could send sensitive data like PII and even passwords to Microsoft and Googles web services.
This article will show you how to prevent that by disabling enhanced spell checking and the Microsoft Editor browser extension.
Why and how to implement browser extension whitelisting
Some extensions installed by millions of users have been found to steal or leak Personally Identifiable Information (PII), passwords or other secrets, take screenshots, act as a key logger, cause phishing, spamming and so on.
This article will show you why and how to implement browser extension whitelisting, preventing the installation of extensions not explicitly allowed by you.
Generate Firefox extension whitelisting configuration in JSON format
The Group Policy setting Administrative Templates/Mozilla/Firefox/Extensions/Extension Management allows you to insert JSON formatted data, that defines the extension settings for Firefox.
To create an extension whitelisting policy, "*" needs to be blocked, and only explicitly allowed extension Ids are allowed.
This script imports the explicitly allowed extension Ids from a CSV file and then creates the needed JSON data to be used in the GPO.
Discover installed and potentially malicious browser extensions
Windows Security pop-up when connecting to AD with LDAPS
Windows Security window pops up asking users for the password to the private key of their certificate.
LDAPS uses certificates, that are not intended for this purpose, to authenticate users.
Danish national identity system NemID can cause this pop-up window, when users have an “employee certificate” (“Medarbejdersignatur”).
PrintNightmare still incompletely patched - What should I do... And what shouldn't I do?
First experiences with customizing Windows 11 Start and taskbar

Script to convert Internet Explorer Favorites to Managed Bookmarks in Chrome / Edge
If you have been managing Internet Explorer for years, perhaps your organization has provided predefined favorites to the users by populating a subfolder in the Favorites folder.
Now you are preparing to migrate to the chromium based Edge browser, and you would like to take advantage of the Group Policy setting “Configure Favorites” to prepopulate some favorites, like the users have been used to.
(In Google Chrome the same setting is called “Managed Bookmarks”)
This Group Policy setting requires a JSON formatted text string, where the favorites / bookmarks are defined.
But how do you get from a Favorites folder with one .URL file for each favorite to a JSON string, that you can insert in the Group Policy setting?
Here’s a script to automate the proces for you
How the script works is described in the Synopsis of the script, so to avoid a lot of redundant text, please read it there :)
You can run the script as is without input parameters and without changing the following variables.
In that case it will:
Read the favorites from %USERPROFILE%\Favorites ($IEFavoritesPath)
Name the Managed Favorites / Bookmarks folder in the browser “IE Favorites” ($bookmarksTopLevelName)
Output the JSON formatted text string to %USERPROFILE%\Documents\ManagedBookmarks.txt ($JSONFile)
After the file creation, simply copy the contents of the file and insert in the Group Policy setting.
Be aware of the limitation in the JSON string length
The limitation is not in the script, but in the ADMX policy and in registry.
For the same reason, the script does not traverse large hierachies, but only one level of subfolders.
The Group Policy setting simply isn’t capable of huge amounts of favorites/bookmarks.
The limit depends on the length of both the URLs and the names of the favorites / bookmarks.
If the Group Policy Editor simply doesn’t allow you to paste the string in, then you have hit the limit ;)
But please test, because I have experienced, that I’m allowed to paste in the string, but Chrome still does not show the bookmarks.
For me, the limit was somewhere between 37254 and 41099 characters in the string.
credits
I have based the part that reads data from the .URL files from a function created by Oliver Lipkau
Get-IniContent script on Technet Gallery
the script:
#requires -version 5
<#
.SYNOPSIS
  Script to convert Internet Explorer's Favorites folder to
  a JSON formatted text file, that can be used in the Group Policy Setting
  "Managed Bookmarks" (Google Chrome) or
  "Configure Favorites" (Microsoft Edge)
.DESCRIPTION
  The Managed Bookmarks and Configure Favorites Group Policy settings for Chrome and Edge
  can define a set of bookmarks/favorites, that are always forced to the browser's Bookmarks/Favorites.
  If you have already predefined favorites in Internet Explorer, this script will help you convert that
  to the string, you need to enter in the Group Policy Setting.

  The script reads the .URL files in the specified folder and converts the name and URL for each
  to one JSON formatted string.

  It can also read subfolders (one sublevel only)

  *** Note! Don't add too many favorites, because of registry limits!
  *** The Group Policy Editor UI will not allow to paste a too long string
  *** For me the limit was somewhere between 37254 and 41099 characters, although the ADMX specifies maxLength to 1000000

.INPUTS
  None. (Define variables below instead)

.OUTPUTS
  Outputs to JSON formatted text file. Path defined in variable below.

.NOTES
  Version:        1.0
  Author:         Martin Jeppesen, https://www.avantia.dk
  Creation Date:  2020-05-13
  Purpose/Change: Initial script development

#>

#----------------------------------------------------------[Declarations]----------------------------------------------------------
$UserProfile = $env:USERPROFILE

# Enter the name of the Managed Bookmarks/Favorites, as they should be named in the browser
$bookmarksTopLevelName = "IE Favorites"

# Enter the path with the favorites stored as .URL files to be converted to Edge/Chrome JSON file
$IEFavoritesPath = "$UserProfile\Favorites"

# Enter the path to the text file, where you want the script to store the JSON formatted string
$JSONFile = "$UserProfile\Documents\ManagedBookmarks.txt"


#-----------------------------------------------------------[Functions]------------------------------------------------------------

# Function to get content from the URL files is based on
# the function made by Oliver Lipkau <oliver@lipkau.net>
# https://gallery.technet.microsoft.com/scriptcenter/ea40c1ef-c856-434b-b8fb-ebd7a76e8d91
# It gets the content of an INI file and returns it as a hashtable
function Get-IniContent ($filePath)
{
    $ini = @{}
    switch -regex -file $FilePath
    {
        "^\[(.+)\]" # Section
        {
            $section = $matches[1]
            $ini[$section] = @{}
            $CommentCount = 0
        }
        "^(;.*)$" # Comment
        {
            $value = $matches[1]
            $CommentCount = $CommentCount + 1
            $name = "Comment" + $CommentCount
            $ini[$section][$name] = $value
        }
        "(.+?)\s*=(.*)" # Key
        {
            $name,$value = $matches[1..2]
            $ini[$section][$name] = $value
        }
    }
    return $ini
}

# Function to get the name and URL for each favorite/bookmark
function Get-BookmarksList ($files)
{
$list = foreach ($item in $files)
    {
        try
            {
            # Get the name based on the .URL filename
            $BookmarkName = $item.Name.TrimEnd(".url")

            # Read the URL from the file content using the Get-IniContent function
            $iniContent = Get-IniContent $item.FullName
            $BookmarkURL = $iniContent["InternetShortcut"]["URL"]
            }

        catch
            {
            $BookmarkName = $item.FullName
            $BookmarkURL = $null
            }

        [PSCustomObject]@{
            url = $BookmarkURL
            name = $BookmarkName
            }
    }
    return $list
}


#-----------------------------------------------------------[Execution]------------------------------------------------------------

#Create the json file using info on the name of the Managed Bookmarks
$jsonTLNamePrefix = '[{"toplevel_name": "'
$jsonTLNameSuffix = '"},'

$jsonTLNameFull = $jsonTLNamePrefix + $bookmarksTopLevelName + $jsonTLNameSuffix

New-Item $JSONFile -ItemType File -Value $jsonTLNameFull


#Enumerate IE Favorites folders in one level only
$folders = Get-ChildItem $IEFavoritesPath -Recurse -Depth 1 | ?{ $_.PSIsContainer }


#Create Folders in Bookmarks and create bookmarks in these folders
foreach ($folder in $folders)
    {
    # Get the name for the folder as it will be displayed in the browser based on file folder name
    $folderName = $folder.Name

    # Get each .URL file from the subfolder
    $folderPath = $folder.FullName + "\*.url"
    $folderURLFiles = Get-ChildItem $folderpath

    # Get the URLs and names of the favorites using the Get-BookmarksList function
    $folderBookmarksList = Get-BookmarksList ($folderURLFiles)


    # Create the JSON formatting for the subfolder
    $folderJSONStart1 = '{"name": "'
    $folderJSONStart2 = '", "children":'

    $folderJSONStart = $folderJSONStart1 + $folderName + $folderJSONStart2


    $folderBookmarksJSON = $folderBookmarksList | ConvertTo-Json -Compress

    $folderJSONEnd = "},"

    $folderJSONcomplete = $folderJSONStart + $folderBookmarksJSON + $folderJSONEnd

    # Add the JSON formatted subfolder to the text file
    Add-Content $JSONFile $folderJSONcomplete -NoNewline
    }


# Get the favorites in the root of the Favorites folder
$URLFiles = Get-ChildItem $IEFavoritesPath "*.url"

# Get the URLs and names of the favorites using the Get-BookmarksList function
$rootBookmarksList = Get-BookmarksList ($URLFiles)


#Convert bookmarks to json
$rootBookmarksJSON = $rootBookmarksList | ConvertTo-Json -Compress

# Remove the first [, because it already exist in the file
$rootJSONTrimmed = $rootBookmarksJSON.Trimstart("[")

# Add the favorites/bookmarks from the Favorites root folder to the JSON formatted text file
Add-Content $JSONFile $rootJSONTrimmed -NoNewline
[Danish Blog Post]: Sådan installerer man NemID Nøglefilsprogram på den Chromium baserede Edge browser
Microsofts Chromium baserede Edge browser er i sin nuværende form allerede utroligt velfungerende og stabil, og det kan være, at man ønsker at prøvekøre den som sin primære browser.
Men så opdager man måske, at man skal bruge NemID nøglefil, og den er p.t. ikke understøttet i den nye Edge browser.
Heldigvis kan det løses ved brug af Edge’s understøttelse af Chrome extensions og midlertidig brug af Developer Mode.
Sådan gør du:
Forudsætning: NemID Nøglefilsprogram skal være installeret og udvidelsen installeret i Google Chrome.
Start med at tilgå: edge://extensions fra Edge Browseren
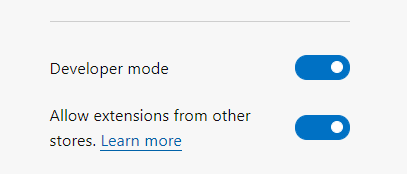
Nederst til venstre skal du slå “Allow extensions from other stores” til (permanent) og “Developer mode” (midlertidigt, mens Nøglefil extension bliver installeret).
Åben chrome://version i Google Chrome

Kopier Profilstien til udklipsholder
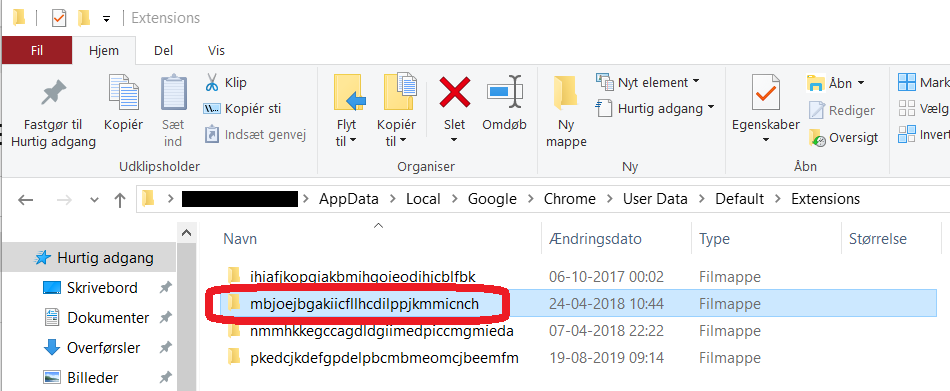
Åben stien i Stifinder. Den markerede folder er id for NemID Chrome extension. Åben den folder.

Højreklik på folderen med versionsnummer, mens du holder SHIFT inde og vælg “Kopier som sti”.
Gå tilbage til Edge browseren, som står på edge://extensions

Vælg “Load unpacked” under installed extensions

Indsæt stien, som du kopierede til udklipsholder fra Stifinder.
Tryk på “Vælg mappe”

Nu bliver extention installeret i Edge og kan ses under edge://extensions -> Installed extensions -> From other sources.
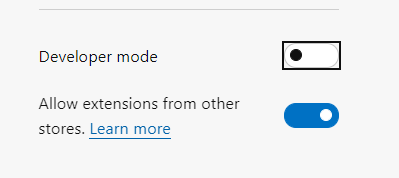
Developer mode kan nu slås fra igen, da NemID extension også virker uden, at Developer mode er slået til.
Og så er du kørende med NemID Nøglefil fra din Chromium baserede browser, som du tester fra.
Find Remote Desktop hosts vulnerable to BlueKeep before someone else does
Background
CVE-2019-0708 or “BlueKeep” is a vulnerability to be taken very serious.
Without CredSSP/NLA an attacker can get full control of a vulnerable RDP host, if he can just make an (unauthenticated) network connection to it.
Microsoft warned about it saying “… any future malware that exploits this vulnerability could propagate from vulnerable computer to vulnerable computer in a similar way as the WannaCry malware spread across the globe in 2017.”
And when they choose to release patches for out-of-support versions of Windows (XP, Vista and Server 2003), you know, that Microsoft is concerned.
This blog post will offer you a PowerShell script, that can scan your network for vulnerable Remote Desktop hosts using nmap and rdpscan.
Robert Graham from Errata Security has created tools to find systems vulnerable to BlueKeep accessible from the internet, and he estimates, that there are about 1 million systems just wating to be hit by a WannaCry-like worm.
And those 1 million doesn’t even include all the hosts, that are available from the LAN on company networks but not published on the internet.
How do I find vulnerable hosts on my own network?
You might have hosts, that have not received the patch, maybe even Windows machines, you don’t even know exist.
Robert Graham has created rdpscan based on another tool.
rdpscan is amazingly simple but powerful: Run it against a range of IP’s, and it will return a list of Remote Desktop hosts and tell you, whether they are vulnerable or not.

Here the hosts are all patched against BlueKeep and two of them protected by CredSSP/NLA

Here, I tested againt two unpatched VM’s, one protected by CredSSP/NLA, the other completely unprotected against CVE-2019-0708.
But if you were to run rdpscan against a lager network (like /16 or /8), it would take too long to finish.
Robert Graham also has created the immensely impresive tool called masscan, which is actually able to scan the entire internet in 6 minutes (!).
Combining masscan (for finding hosts with port 3389 open) with rdpscan (to find out if the hosts found with masscan are vulnerable) would make it possible to finish scanning your entire enterprise network in a relatively short time.
But… You have to compile masscan yourself. It can be compiled on Windows using MinGW or Visual Studio.
If you, like me, feels a bit less Dev than IT Pro and uneasy about compiling for yourself ;), then here’s another solution, albeit not one that will scan as fast as masscan.
Using nmap in conjunction with rdpscan
I have created a PowerShell script, that will run a fast nmap scan of your network to find hosts with port 3389 active and then have rdpscan to scan the hosts found by nmap to see, if they are vulnerable.
It is nowhere near as fast as with masscan, but it doesn’t require you to do compiling.
And the nmap scan is optimized for performance.
I scanned a 24 bit subnet in 5 seconds.
The following rdpscan based on the nmap scan then took 45 second.
A scan of a 16 bit subnet can be done in about 6 minutes, depending on how many RDP enabled hosts are in those 65.536 IP-adresses.
But first:
All credit goes to:
Robert Graham for creating rdpscan
Rob VandenBrink, who created a PowerShell script on which I based mine, that uses the XML ouput from nmap in PowerShell.
Download nmap
Download the latest stable Windows release from: https://nmap.org/download.html
Install using defaults and make sure, that the installation path is C:\Program Files (x86)\Nmap.
Download rdpscan
Go to https://github.com/robertdavidgraham/rdpscan
Below the readme.md headline, you will find download link to the Windows Binary.
Save to C:\Temp\rdpscan-windows
Extract to C:\Temp\rdpscan-windows
(if you choose to extract to another path, remember to change the path in the last line of the script below)
Create the PowerShell script
Here is the script:
(Updated 2019-06-12 with $ErrorActionPreference = "SilentlyContinue" to make sure it also works, if that variable has been changed from the default. It also now only displays nmap output of open RDP ports)
(Update 2019-07-02: See Brian Hampson’s comment below for an extension of the script to output both hostname and IP-address. Thanks Brian!)
$ErrorActionPreference = "SilentlyContinue"
$fileappendix = get-date -Format s | foreach {$_ -replace ":", ""}
$filename = $env:TEMP + "\nmapRDPScan" + $fileappendix + ".xml"
$nmappath = 'C:\Program Files (x86)\Nmap\nmap.exe'
$argScanNet = Read-Host "Type Subnet Address. I.e. '10.0.0.0'"
$argScanMaskbits = Read-Host "Type Mask Bits. I.e. '16'"

& $nmappath `-sS `-p 3389 `-T5 `-n `-`-open `-`-min`-hostgroup 256 `-`-min`-parallelism 100 `-`-max`-rtt`-timeout 300ms `-`-max`-retries 3 `-`-send-eth $argScanNet`/$argScanMaskbits `-oX $filename

[xml]$nmapRDPScan=Get-Content $filename

$hosts=$nmapRDPScan.selectnodes("//host")
$list = @()
$hosts | foreach {$_.address | foreach {if ($_.addrtype -eq "ipv4") {$hostip = New-Object psobject ;
    $hostip | Add-Member -MemberType NoteProperty -Name ip -Value $_.addr} }
    $_.ports | foreach {$_.port | foreach {
        $val = New-Object psobject ;
        $val | Add-Member -MemberType NoteProperty -Name Host -Value $hostip.ip
        $val | Add-Member -MemberType NoteProperty -Name Proto -Value $_.protocol
        $val | Add-Member -MemberType NoteProperty -Name Port -Value $_.portid
        $val | Add-Member -MemberType NoteProperty -Name State -Value $_.state.state
        $val | Add-Member -MemberType NoteProperty -Name Service -Value ($_.service.name + " "+$_.service.tunnel)
        $val | Add-Member -MemberType NoteProperty -Name Servicedesc -Value $_.service.product
if ($val.proto -ne "") {$list += $val}
}}}


Write-Host "`r`n--------------`r`nNow testing all nodes with port 3389 open"
Write-Host "Depending on the number of nodes, this can take a considerable amount of time`r`n--------------`r`n"

$list | Where-Object {$_.State -eq "open"} | ft Host -HideTableHeaders | C:\Temp\rdpscan-windows\rdpscan.exe `-`-file `-

Write-Host "`r`n--------------`r`nScan complete"
Write-Host "You can find more information on each host in the nmap scan XML file"
Write-Host "Location of file:"
Write-Host "$filename`r`n--------------`r`n"
You simply run the script, input the subnet address and the mask bits, and then let it run.
If you run it against a 10.0.0.0/8 network, expect to let it run for more than 24 hours.
Then afterward, you have a list of RDP hosts, and which IP’s are vulnerable and needs patching (or at least having NLA enabled).
Happy patching ;)
Missing desktop app icons in Start menu customized with Start Layout XML
At a customer, we were customizing and locking down the Start menu using StartLayout.xml and Group Policy at some locked down computers.
The strange thing was, that desktop apps (W32/x86 programs), that were supposed to get pinned, didn’t appear in Start. But Modern apps appeared fine.
Every other requirement was taken care of.
It turns out, that two group policy settings were the root cause.
If either of these two Group Policy settings are enabled, addition of pinned desktop apps to Start will be blocked:
Remove common program groups from Start Menu
Remove user's folders from the Start Menu
Both of them are placed in Administrative Templates\Start Menu and Taskbar
Once these Group Policy settings are removed, the desktop apps are pinned.
Lingering access with Temporary Group Memberships
Beware of NTLM when using Temporary Group Memberships
Short-term group memberships might lead to long-term permissions
Temporary Group Memberships are a very welcome addition to Windows Server 2016 Active Directory Domain Services.
It gives you the means to elevate privileges for someone temporarily.
However, this blog post is not here to give instructions on enabling it or using it. You will find plenty of that elsewhere.
This blog post is here to remind you not to trust this feature blindly.
Your short-term group membership might give you long-term privileges.
Quick and dirty workaround for unstable Wi-Fi in Windows 10
One of the commonly reported issues after upgrading to Windows 10 is that Wi-Fi becomes unstable.
In the cases that I have seen, Wi-Fi will be trying to connect but is stuck on "Attempting to authenticate".
Most people reboot to get online, but actually, disabling and reenabling the WLAN adapter will get you online much faster.
Until a permanent fix is released – whether it will be a hotfix from Microsoft or a driver update for the affected adapters – I have created a quick and dirty workaround, that:
Finds all wireless network adapters, that are in the state Disconnected
Disables the network adapter
Enables the network adapter
This gets you connected to the WLAN almost instantaneously, once it's been reenabled.
It consists of a PowerShell script, and a batch file that calls the PowerShell script and runs it elevated (which is required in order to perform the actions on the network adapter).
To run the PowerShell script, you must first have run Set-ExecutionPolicy RemoteSigned in a PowerShell session.
Before you do anything else:
Check if you have VPN software installed
If you do, check if that version is compatible with Windows 10
Especially there are issues with older versions of Cisco VPN client and SonicWall Global VPN clientIf you do have an unsupported VPN client, uninstall it and reboot
If this does not help, follow the recommendations in the Microsoft KB article here: No wireless networks are available after you upgrade from Windows 8.1 to Windows 10
Also, make sure that your antivirus software is compatible with Windows 10
If this does not apply to you or does not help, then you can try my workaround:
Copy this and paste it into a text editor and save as C:\RestartWLANNIC.ps1:
Get-NetAdapter |

Where-Object {$_.PhysicalMediaType -eq "Native 802.11" -and $_.MediaConnectionState -eq "Disconnected"} |

Disable-NetAdapter -Confirm:$False -PassThru |

Enable-NetAdapter -Confirm:$False
Missing ”Get Windows 10” icon on unmanaged Windows 7 – a few tips
On Wednesday July 29'Th 2015 the staged rollout of Windows 10 will start.
By now, you would have seen this white Windows logo for the "Get Windows 10" application:

On managed computers in an enterprise environment, you would probably not want it to appear, as you want to be in control of rolling out Windows 10 on the computers.
On unmanaged computers that are under your manual control on the other hand, you might want the "Get Windows 10" to appear, so that you can reserve Windows 10 and get it as soon as possible.
However, on some PCs the icon does not appear.
In my experience, most of them are older computers, that where originally designed for Windows Vista.
Here are a few tips on, what you can do to get the icon to appear and reserve Windows 10 for your unmanaged computer.
Prerequisites
First – of course – make sure, that Windows 7 Service Pack 1 is installed.
Then there are some Windows updates, that should be installed.
Microsoft has released several updates that together will check your computers readiness for Windows 10 and offer the reservation, when it finds your computer ready.
The infamous KB3035583 will install the "Get Windows 10" application and some Scheduled Tasks that assist in verifying the computers readiness.
The Scheduled Tasks are placed in the task library under Microsoft\Windows\Setup\gwx.
GWX is an abbreviation of "Get Windows 10" (X as 10 in roman numbers)
Others like KB2952664 and KB3068708 makes Windows 7 capable of assessing its Windows 10 readiness.
The Compatibility Appraiser (run by Scheduled Tasks placed under \Microsoft\Windows\Application Experience\Microsoft Compatibility Appraiser) is updated by some of the required updates.
How to check if the updates are installed on your computer
- Run Powershell.exe
- Run this command:
Get-HotFix KB2952664,KB2990214,KB3021917,KB3035583,KB3068708,KB3065987
After searching for the updates, it should list all six updates as installed:

If some of the updates are missing, you should let Windows Update install them.
Be aware, that KB3068708 is a recommended update, KB2952664 and KB3021917 are listed as Optional, and KB3035583 has been reissued several times with varying categorization.
So depending on your Windows Update configuration, they might need to be checked for install manually, and you should look for them under Optional updates as well.
Trigger the readiness check and turn on the Get Windows 10 app if applicable
Once all necessary updates are installed, and the computer has been rebooted, you could try to speed up the process with checking your computers readiness.
Microsoft has created a script that will trigger the necessary Scheduled Tasks and run the Get Windows 10 app, if the computer is ready for Windows 10.
You can find the script along with instructions here:
https://support.microsoft.com/en-us/kb/3080351
Go to the section "Enable the Get Windows 10 app (notification area icon)"
Please note, that there are two versions of the script, one for English versions of Windows, and one for non-English versions.
Alternatively, you could just replace the word "Ready" with the localized word in this line:
schtasks /query /TN "\Microsoft\Windows\Application Experience\Microsoft Compatibility Appraiser" | findstr Ready
In a Danish Windows 7 for example, it should be "Klar" instead of "Ready".
If you still do not get the Get Windows 10 icon
In my experience, here's a few other issues, that could prevent you from being offered to reserve Windows 10.
Devices not working properly
Check in Device Manager for devices with yellow exclamation marks.
If any, try to fix the problem, for example by updating the device driver or uninstalling the device.
Devices with device drivers incompatible with Windows 10
Check in Windows Update under Optional updates to see, if there are devices, that Windows Update has updated drivers for.
I personally prefer – if possible - to find the latest driver from the computer manufacturers rather than using the Microsoft provided, because Microsofts driver might not always be the right one for your specific computer model.
After installing updated drivers, reboot and run the ReserveWin10-script again.
If the Get Windows 10 icon still does not appear, search for Windows Updates again, and see if Windows still want to update the device driver.
In that case, you might have to choose the Microsoft provided driver.
Software that installs drivers
You might have software installed, that comes with device drivers that are incompatible with Windows 10.
As an example, one computer had old Nokia PC Suite and Nokia Cable Driver software installed.
Another had a Virtual Clone Drive installed, that was malfunctioning.
Especially look for software that installs virtual devices, like virtual display drivers, virtual NICs and so on.
Uninstall all of those kinds of software that you no longer need.
PS: Don't worry about Office 2003 preventing you from getting the Get Windows 10 icon. I have a computer next to me right now, that has both Office 2003 installed and Windows 10 reserved.
Remember to reboot the computer often in the process above, because many of the readiness checks are triggered at reboot and/or logon.
With all of the above finished, the computer rebooted, and the ReserveWin10 script run again, I have been successful on getting Windows 10 reserved on all the computers, that I have had issues with.
I hope these tips will help you as well.
A PowerShell script to ease migration of File Servers in VMware from 2003 to 2012 R2
Now, that EOS for Windows Server 2003 is coming closer, we need to find easy ways to move away from that version.
File servers are relatively easy compared to other servers, that have locally installed software/services.
If you have Windows Server 2003 file servers, you could use several methods, for example:
Windows Server Migration Tools (not recommended on more than 100 GB of data)
Microsoft File Server Migration Toolkit (https://www.microsoft.com/en-us/download/details.aspx?id=10268)
Uses DFS Replication, so be careful with a large number of small files, for example user profiles.Simple ROBOCOPY
Backup source and restore on destination
SAN data migration
But here's another easy way.
If your file servers are virtual, you could simply make a copy of the virtual disk file and attach to a new server, where share information is imported from the source server, and then rename the new server to the source servers name.
With VMware the easiest way to accomplish this is making a clone of the source VM and then use the cloned VMDK's on the destation VM.
The share information can be exported from this Registry hive:
HKLM\SYSTEM\CurrentControlSet\Services\LanmanServer\Shares
After attaching the cloned VMDK's to the destination server, assigning them the correct drive letters in Windows and shutting down the source server, the destination server can now take over the source server's name and IP address.
However, please note, that the clone will be an exact replica of the source server at the initiation of the cloning process.
Therefore we need to prevent users from making changes to the source server during the cloning process.
We do that by stopping and disabling the LanManServer service.
A PowerShell script to automate this process for you?
Well why not? :)
Below is an example of, how that could be done in VMware Vsphere PowerCLI.
We could have included automation of assigning the drive letters in Windows on the destination server.
That would include querying both VMware and Windows and making tables for comparison.
Time did not allow for that, so if you want that, I'll leave it up to you :) You can find example code for similar operations online, maybe you can use some of that.
Add-PSSnapin VMware.VimAutomation.Core

Set-PowerCLIConfiguration -InvalidCertificateAction Ignore -Confirm:$false

$VMWareVIServer = Read-Host "Type the name of the VMwareVIServer"

$SourceVMName = Read-Host "Type the single-label name of the 2003 server"

$SourceVMFQDN = Read-Host "The the FQDN of the 2003 server"

$CloneName = Read-Host "Type the name of the created 2003 clone"

$DestinationTempName = Read-Host "Type the current - temporary - name of the 2012 R2 server"

$MailRecipient = Read-Host "Type the mail-recepient for confirmation mail after cloning"

$MailSender = Read-Host "Type the senders email address"

$SMTPServer = Read-Host "Type the FQDN of the SMTP server?"

$ADCred = Get-Credential -Message "Type the account with which to perform AD/Windows computer tasks"

$VMwCred = Get-Credential -Message "Type the account with which to perform the VMware tasks"


Write-Host "*** Please wait 30-60 seconds, while we connect to VMware *** "

Connect-VIServer $VMWareVIServer -Credential $VMwCred -ErrorAction Stop

#Check that the typed in Source VM actually exist

Write-Host "**** Please wait 30-60 second, while we check that $SourceVMName exists in VMware ***"

$SourceVMObject = VMware.VimAutomation.Core\Get-VM | where {$_.name -eq $SourceVMName}

if ($SourceVMObject -eq $null)

    {

    $Host.UI.WriteErrorLine("[-] VM $SourceVMName specified does not exist on this server!")

    Disconnect-VIServer * -Confirm:$false

    exit

    }

#Check that the typed in Clone Name does not exit

Write-Host "**** Please wait 30-60 seconds, while we check that $CloneName does not already exist in VMware ***"

$CloneVMObject = VMware.VimAutomation.Core\Get-VM | where {$_.name -eq $CloneName}

if ($CloneVMObject -ne $null)

    {

    $Host.UI.WriteErrorLine("[-] VM $CloneName already exists on this server")

    Disconnect-VIServer * -Confirm:$false

    exit

    }


Function Clone-VM

{

#Stop and disable LanManServer service on SourceVM to ensure, that no files are updated during cloning

Invoke-Command -ComputerName $SourceVMFQDN -Credential $ADCred {Stop-Service LanManServer -Force -PassThru -ErrorAction Continue}


#Check that LanManServer service on SourceVM has been successfully stopped, and try once more if not. Exit script on second failed attempt.

$SourceService = Invoke-Command -ComputerName $SourceVMFQDN -Credential $ADCred {Get-Service LanManServer}

if($SourceService.Status -ne "Stopped")

    {

    Invoke-Command -ComputerName $SourceVMFQDN -Credential $ADCred {Stop-Service LanManServer -Force -PassThru -ErrorAction Continue}

    $Timeout = New-Timespan -Seconds 30

    $StopWatch = [diagnostics.stopwatch]::StartNew()

    While (($StopWatch.elapsed -lt $timeout) -and ((Invoke-Command -ComputerName $SourceVMFQDN -Credential $ADCred {Get-Service LanManServer}).Status -ne "Stopped") )

        {

            Start-Sleep -seconds 3

        }

    $StopWatch.Stop()

    $SourceService = Invoke-Command -ComputerName $SourceVMFQDN -Credential $ADCred {Get-Service LanManServer}

    if($SourceService.Status -ne "Stopped")

        {

        $Host.UI.WriteErrorLine("[-] LanManServer Service did not stop on source server $SourceVMName. Script exits")

        Send-MailMessage -To $MailRecipient -Subject "Cloning script for $SourceVMName failed" -Body "LanManServer Service did not stop on source server $SourceVMName. Script exits" -SmtpServer $SMTPServer -From $MailSender -Priority High -ErrorAction Continue

        exit

        }

    }

Invoke-Command -ComputerName $SourceVMFQDN -Credential $ADCred {Set-Service LanManServer -StartupType Disabled -PassThru -ErrorAction Continue}


#Cloning of SourceVM and ensurance, that clone is powered off

$VMResourcePool = $SourceVMObject.ResourcePool

$ProcessStartTime = Get-Date

Write-Host "Cloning process started at"$ProcessStartTime

VMware.VimAutomation.Core\New-VM -VM $SourceVMName -Name $CloneName -ResourcePool $VMResourcePool

$CloningFinishTime = Get-Date

Write-Host "Clone created at"$CloningFinishTime

#Ensure that the clone is in a stopped state

VMware.VimAutomation.Core\Get-VM $CloneName | VMware.VimAutomation.Core\Stop-VM -Confirm:$false -RunAsync -ErrorAction SilentlyContinue

$ProcessFinishTime = Get-Date

Write-Host "Process finished at"$ProcessFinishTime

#Send email to MailRecipient when function finishes

Send-MailMessage -To $MailRecipient -Subject "Cloning of $SourceVMName to $CloneName has completed" -Body "Cloning of $SourceVMName to $CloneName has completed. Start Time: $ProcessStartTime. Finished at: $ProcessFinishTime" -SmtpServer $SMTPServer -From $MailSender -Priority High -ErrorAction Continue

}


#Ask for OK for initiation of cloning process

$Title = "Start Cloning?"

$Message = "Do you want to stop SMB access to $SourceVMName and start cloning $SourceVMName to $CloneName ?"

$Yes = New-Object System.Management.Automation.Host.ChoiceDescription "&Yes", `

"Starts cloning process and then stops and disables LanManServer service on source server."

$No = New-Object System.Management.Automation.Host.ChoiceDescription "&No", `

"Leaves the script without making any changes."

$Options = [System.Management.Automation.Host.ChoiceDescription[]]($Yes, $No)

$Result = $host.ui.PromptForChoice($Title, $Message, $Options, 1)

switch ($Result)

    {

    0 {Clone-VM}

    1 {exit}

    }


Disconnect-VIServer * -Confirm:$false
Microsoft has reached Code Complete on Work Folders for iOS
Today at TechEd Europe 2014 Microsoft announced, that they have reached Code Complete on the iOS app for using Work Folders on iPad.
This means, that Work Folders now makes it possible for you to keep users home folders on premises, but allowing them to reach those data from many different devices and devicetypes, and from the internet. This will make it less attractive for the users to upload their data to Dropbox or other non-company-managed servicess in order to be productive outside the company offices.
Work Folders is now available for:
- iOS. App Store URL: https://itunes.apple.com/gb/app/id950878067
- Windows 8.1
- Windows RT 8.1
- Windows 7 as a download from: http://blogs.technet.com/b/filecab/archive/2014/04/24/work-folders-for-windows-7.aspx
For Windows 7 you would need a Pro, Enterprise or Ultimate edition, and it would have to be domain joined.
This is because, it is the only way, you can manage the data on the client from serverside. Without these requirements met, data would be downloaded to the Windows 7 client, but you as an admin would not be able to remote wipe the data or require other security settings being implemented on the client.
An Android tablet app will also be developed, but is not here yet.
But for now, an iPad is a very welcome addition.
Be aware, however, that Code Complete does not mean, that you will find the app in the App Store today.
It first needs to go through the approval process at Microsoft and at Apple's App Store.
But we should see it soon.
Remote Management of Microsoft Hyper-V Server 2012 R2 in a Workgroup
If you have installed Microsoft Hyper-V Server 2012 R2 in an environment, where all your Domain Controllers are virtual machines on the Hyper-V Server host, you probably would not want to join the Hyper-V Server host to the domain.
In that case, remote management of the Hyper-V Server can be a little challenging.
If you want to remotely manage the Hyper-V Server using a Hyper-V Manager console, when both your client and the Microsoft Hyper-V Server are in the same Workgroup, that can be done.
Quite a few configurations are necessary, but fortunately, HVRemote jumps in to make this process far more easy.
http://blogs.technet.com/b/jhoward/archive/2008/11/14/configure-hyper-v-remote-management-in-seconds.aspx
Here's the problem:
When you run hvremote /add:<ClientName>\<Username> on the server while being joined to a workgroup, part of the output will look like this:
***** GetTrustee Failed: <ClientName>\<Username> not found
***** If <ClientName> is a domain, you need to be connected to the domain for this to work
INFO: HVRemote complete
The server simply cannot resolve the security principal of the user on the client.
In that case, you can instead save credentials on your client with which, you will connect to the Hyper-V Server, using the Command Line Utility, CMDKEY:
- Open an Elevated Command Prompt on the client, you will be running Hyper-V Manager from
- Type: CMDKEY /add:<Server's hostname> /user: <Server's hostname>\<Username> /pass
- Type the password when prompted for it
Now you should be able to connect to your Hyper-V Server from Hyper-V Manager – Provided you have completed all other required configuration steps on the client and on the server.
No, you do not need to run ADPREP manually anymore
There are many great step-by-step guides out there about upgrading your Active Directory forest to Windows Server 2012 (R2).
There is however one thing, most of them seem to forget:
ADPREP, that prepares the forest and domain(s) for the new Active Directory version, is now a part of the Active Directory Domain Services installation process, both when using the Server Manager Wizard and when running Install-AddsDomainController.
The Windows Server 2012 (R2) server, on which the AD DS installation process is running, will perform the ADPREP tasks remotely on the existing Domain Controllers.
This makes the installation process significantly easier, as you do not have to attach the installation media to an existing Domain Controller and run ADPREP from there.
There is however one case, where you would need to run ADPREP manually:
If you have never run the ADPREP /DOMAINPREP /GPPREP (which will add ACEs to the GPOs in the SYSVOL folder to enable additional RSOP functionality) in an existing domain before, this will need to be done manually.
If you have already run ADPREP from Windows Server 2003 SP1 or higher previously, most likely /GPREP will have been run already.
So go ahead and run that AD DS Installation wizard (or PowerShell cmdlet), and don't worry about how you will run the ADPREP from the existing Domain Controllers, because you don't have to.